

|
|
|

|
External temperature sensor connection for 206+ |
| • Homepage » PEUGEOT MODIFIED PLATFORM » 206 | |
| 08.05.2020 18:41 | # 1 |
 Alicilik Alicilik |
|
|
The subject has been discussed and the tools and models can vary greatly. At the same time, old vehicles do not have detailed connection schemes, so I will share the connection schemes on my own vehicle with all the details, I hope it will be useful to friends. Everything is exactly the same with the number and connection codes on the vehicle. The connection scheme is just like this. 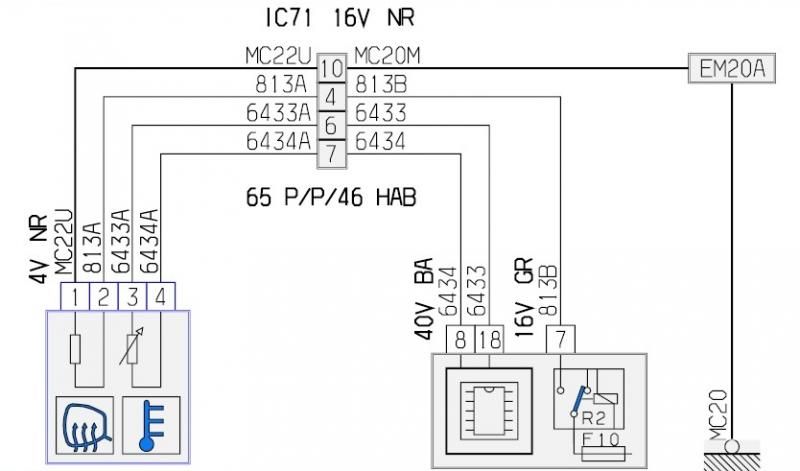 The 4V NR section on the left is the socket that appears when you remove the plastic behind the mirror. It is generally 4 wires, 2 wires go to the mirror resistance, 2 wires (6432-6433) to the heat sensor. It is the socket part under the IC71 and 16V NR door hinge in the middle. Here you can determine the place on the numbers according to the author. The last part on the right is BSi . The 40V BA socket can be determined by its position on the BSi in the table below. The process to be done is to follow the installation line as in the photo above and complete the missing part. I have repeatedly highlighted the codes and settlement numbers, so please be very careful. This may differ from vehicle to vehicle. Socket locations and codes on Bsi 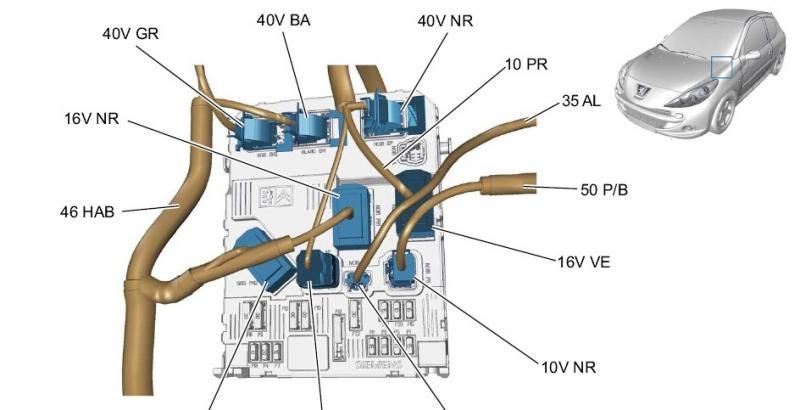 The layout of the sockets on the BSi is shown here. We need the 40V BA socket. We need to find and open it and connect it with pins 8 and 18 . Sockets and codes on the door 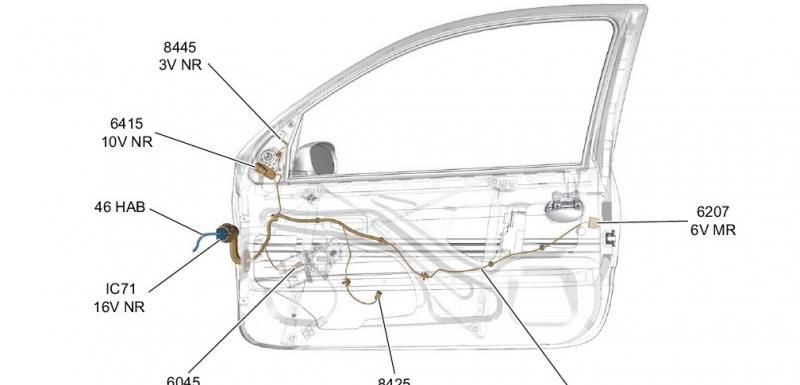 Here you can see the location and number codes of the sockets on the door. This is the detailed electric scheme on my own vehicle. All connections are visible because there is a wiring on my vehicle. Vehicles similar to my vehicle can use this scheme exactly. For other models, I have to examine the chassis number. The main thing is to find the vehicle that has the same features as your vehicle and complete the installation of your own vehicle by making use of its scheme, so the job is complicated for older models. Valid for 2010-2011 206+ 1.4 HDi. Good luck with. |
|
| 08.05.2020 18:41 | # 2 |
| Alicilik |
|
|
Sorry for the delay. 11/2013 sedre installation forced us a lot 2-3 days we struggled with the friend but we could solve it. |
|
| 08.05.2020 18:41 | # 3 |
 Serkan Serkan |
|
|
Good health Ali, you explained well. 
|
|
| 08.05.2020 18:41 | # 4 |
 ahmed206 ahmed206 |
|
|
I do not know if your hands would fit with 206, but my head wouldn't have 
|
|
| 08.05.2020 18:41 | # 5 |
| Alicilik |
|
|
Sedre made a lot of work this time, but it was solved. it was very solid. Principle charts of 206+ used to be published in the past. I hope it works for you. Even if the car is with me, it's half an hour. |
|
| 08.05.2020 18:41 | # 6 |
 madblueblacksea madblueblacksea |
|
|
I found the socket and made the connection, but it didn't show on the screen, I think it needs to be activated. I read the 1.6v value without installing the sensor and it fell to 0.5 when I installed the sensor. thanks for your effort and sharing
|
|
| 08.05.2020 18:41 | # 7 |
| Alicilik |
|
|
Not without activation. The sensor is already resistor. Resistance varies depending on the temperature and this change is measured in degrees. voltage drop is normal. You need to open from 2 places From 1 screen From 2 bsi |
|
| 08.05.2020 18:41 | # 8 |
| Alicilik |
|
|
wait a little, let me replace him, switch to xp;) *** xp whatever the cable is, no car with me: D I will connect to the car tomorrow and throw it |
|
| 08.05.2020 18:41 | # 9 |
| madblueblacksea |
|
|
2 places.? Wouldn't we save someone if we did the job uphill :-D
|
|
| 08.05.2020 18:41 | # 10 |
| ahmed206 |
|
|
So, what are the materials that we should have against any deficiencies before attempting this work, so do they work with any cable? If I buy a cable, will this cable be something like that? I want this sensor  PS: I got the printout, by the way, the fortune that I will do at the first opportunity. |
|
| 08.05.2020 18:41 | # 11 |
| Alicilik |
|
|
Now I can not determine the material, since I do not know where and what the installation status of the vehicles is. But for those who have no installations, I can say the following, 1- heat sensor under mirror 2- 2 pins to connect the cables of the sensor to the socket behind the mirror and 2 pins in return. 3- Cable from socket to door socket 4- pin to the door part of the door socket 5- pin to the vehicle part of the socket 6- Cable from door socket to BSi 6- BSi is also pin into the appropriate socket. this much. As I said, wherever the equipment is missing in your vehicle, you need these materials. Unfortunately, in 206, it is not only necessary to open the screen, but also to open the bsi. |
|
| 08.05.2020 18:41 | # 12 |
 ultrali_18 ultrali_18 |
|
|
Based on the information you wrote, Ali Hodja, I bought the external temperature sensor from the Peugeot service. Aynam is not electric and one line (two wires) comes to the mirror socket. I wonder if I connect the mirror to the sockets there to test the sensor I have? Is it possible to make a chassis or break the sensor? Because I don't know what the cables are for.
|
|
| 08.05.2020 18:41 | # 13 |
| Alicilik |
|
|
[QUOTE = ultrali_18] Ali Hodja, based on the information you wrote, I bought the external temperature sensor from the Peugeot service. Aynam is not electric and one line (two wires) comes to the mirror socket. I wonder if I connect the mirror to the sockets there to test the sensor I have? Is it possible to make a chassis or break the sensor? Because I don't know what the cables are for. [/ QUOTE] We check the installation together and it is not clear what and where it is. |
|
| 08.05.2020 18:41 | # 14 |
| ultrali_18 |
|
|
Okay, so I don't touch anything to keep everything intact :)
|
|
| 08.05.2020 18:41 | # 15 |
|
Mr. Bey, I sent you the chassis number. We could not make the connection.
|
|
| 08.05.2020 18:41 | # 16 |
| Alicilik |
|
|
[QUOTE = rhombeus] Ali Bey, I sent you a chassis number, we couldn't make the connection [/ QUOTE] Could you write again, sorry, I guess it didn't boil. |
|
| 08.05.2020 18:41 | # 17 |
|
I sent the message
|
|
| 08.05.2020 18:41 | # 18 |
 Hello, I bought my car 206 2008 sedan outdoor temperature sensor, I searched the site for a little bit, I couldn't find a cable next to the mirror, and then I found the orange gray weak cable as described in the socket on the passage of the door. works . Knowledgeable friends, I expect your help, I don't want to do anything wrong
|
|
| 08.05.2020 18:41 | # 19 |
 peugeot murat peugeot murat |
|
|
THE FRIENDLY EXTERNAL ASI SENSOR IS MOUNTED TO THE MIRROR. INTERIOR SYSTEM IS READY.
|
|
| 08.05.2020 18:41 | # 20 |
|
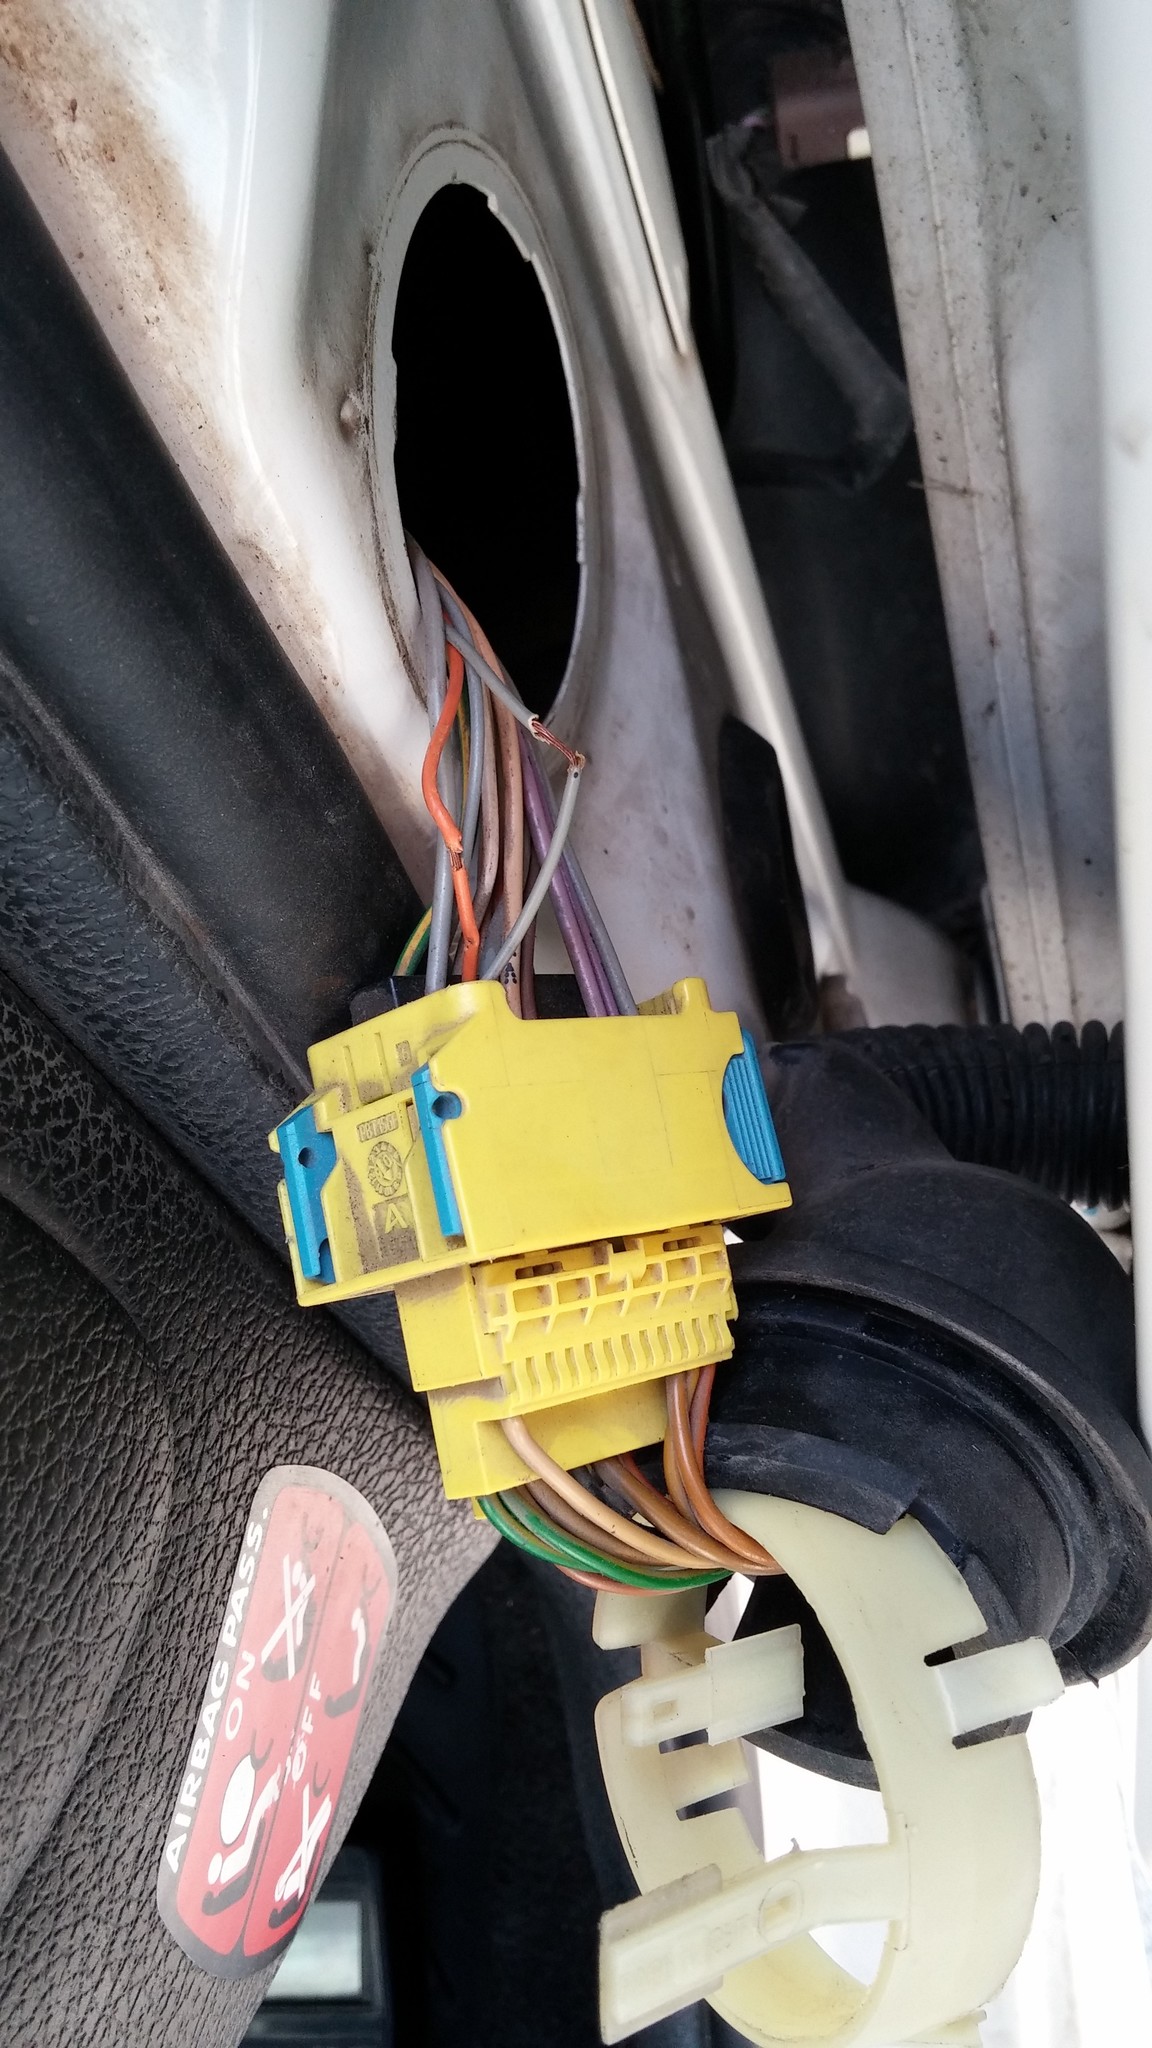
Mr. Murat, hello was not in my mirror, I bought it myself, I removed the cover of the mirror arm from the inside, there was a cable like this picture 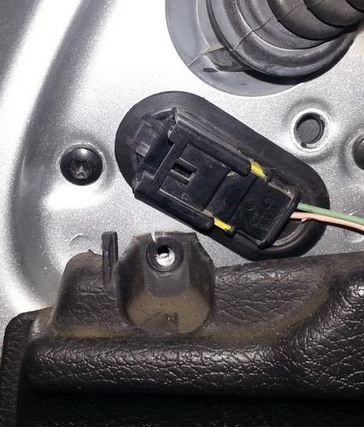 Thinking that it was a residence for me, I did some research and removed the cable bellows from the door to the chassis, this is the last case I'm texting you for the schema
|
|

