

|
|
|

|
Digital air conditioner blows left hot right cold |
| • Homepage » PEUGEOT MODELS (FAULTS AND SOLUTIONS) » 307 | |
| 08.05.2020 20:15 | # 1 |
|
|
|
| 08.05.2020 20:15 | # 2 |
|
His rank ran away, or when he got hurt, he showed how many he had lowered, so he was completely low until lo
|
|
| 08.05.2020 20:15 | # 3 |
|
[QUOTE = Serkant41] He ran out of degree or showed how many he showed when he got hurt. I tried them all. I am powered by the routing engines. |
|
| 08.05.2020 20:15 | # 4 |
 ggitaristt ggitaristt |
|
|
[QUOTE = sckn22] [QUOTE = Serkant41] He ran out of degree, or he showed how many he was showing when he got hurt, so he was completely low until lo came out [/ QUOTE] I tried them all. I am being superseded by the routing engines. Maybe there is something that happens to you [/ QUOTE] Yes, the problem is exactly where you suspect. But there is a problem with plastic parts, not the engine. |
|
| 08.05.2020 20:15 | # 5 |
 sonerkyl sonerkyl |
|
|
as you say the problem is caused by this piece |
|
| 08.05.2020 20:15 | # 6 |
|
[QUOTE = sonerkyl] as you said the problem originates from this piece Can we do this ourselves? Who knows how much we want to take to the master. Where do we have to disassemble to reach this piece?
|
|
| 08.05.2020 20:15 | # 7 |
| sonerkyl |
|
|
hocam we have members in the forum related topic |
|
| 08.05.2020 20:15 | # 8 |
|
[QUOTE = sonerkyl] teacher, we have members in the forum related topic I https://forum.peugeotturkey.com/forum_posts.asp?tıd=42651&title=307-klima-sag-sol-yon-sorunu-cozul [/ QUOTE] I just noticed that I read the subject and went to the car, I removed it as your friend did, but I did not find it.
 |
|
| 08.05.2020 20:15 | # 9 |
| sonerkyl |
|
|
Honestly, I don't know how my man was dismantled.
|
|
| 08.05.2020 20:15 | # 10 |
| sonerkyl |
|
|
but this video will work for you. [TUBE] v9engtpabı4 [/ TUBE]
|
|
| 08.05.2020 20:15 | # 11 |
|
Sir, thank you for your help. The left side needs to be removed, right?
|
|
| 08.05.2020 20:15 | # 12 |
| sonerkyl |
|
|
You are welcome, teacher, I couldn't see it properly, but I think we need to remove and look like a screw in the middle of the teeth.
|
|
| 08.05.2020 20:15 | # 13 |
|
I had bought this repair kit before and changed both sides. The left side is actually much easier and shorter than the right side. You are removing the cover under the steering column. This has no claw screw. There is a 3-4 cm gap between the steering column lower part. From there, you can insert your hand, pull the cover to yourself and bend it down, detach it from the top nails, then remove it from the side and bottom nails. Remove the three black plastic studs just under this cover and remove the soft trim just above the pedals. The center console trim just to the right of the accelerator is already symmetrical to the right side. When the two torx screws that are right next to the air outlet are removed, pull outwards. Below that, the servo motor you will remove has two crossed torx screws. One of them corresponds to the plastic frame that holds the cover you first removed. You need to unscrew that screw by stretching it without breaking the frame, but it does. This is the most troubling part of this job. When you disconnect the socket and remove the servo motor, you will reverse the assembly by attaching the repair kit and screwing the motor as in the video. What you should pay attention to when installing the engine is that the position of the flap on the console is the same as the gear position on the engine. So just plug in the electrical socket before screwing on the motor. Start the car and the bodywork. Then you should rest the left temperature adjustment gear on the console to the far right or far left by hand. Depending on the direction you are resting, hot or cold air will come. Set the left side degree setting to HI or LOW according to the incoming air. After the servo rotates accordingly, you can turn off the ignition and screw the motor.
|
|
| 08.05.2020 20:15 | # 14 |
|
I couldn't find where these servo motors are. 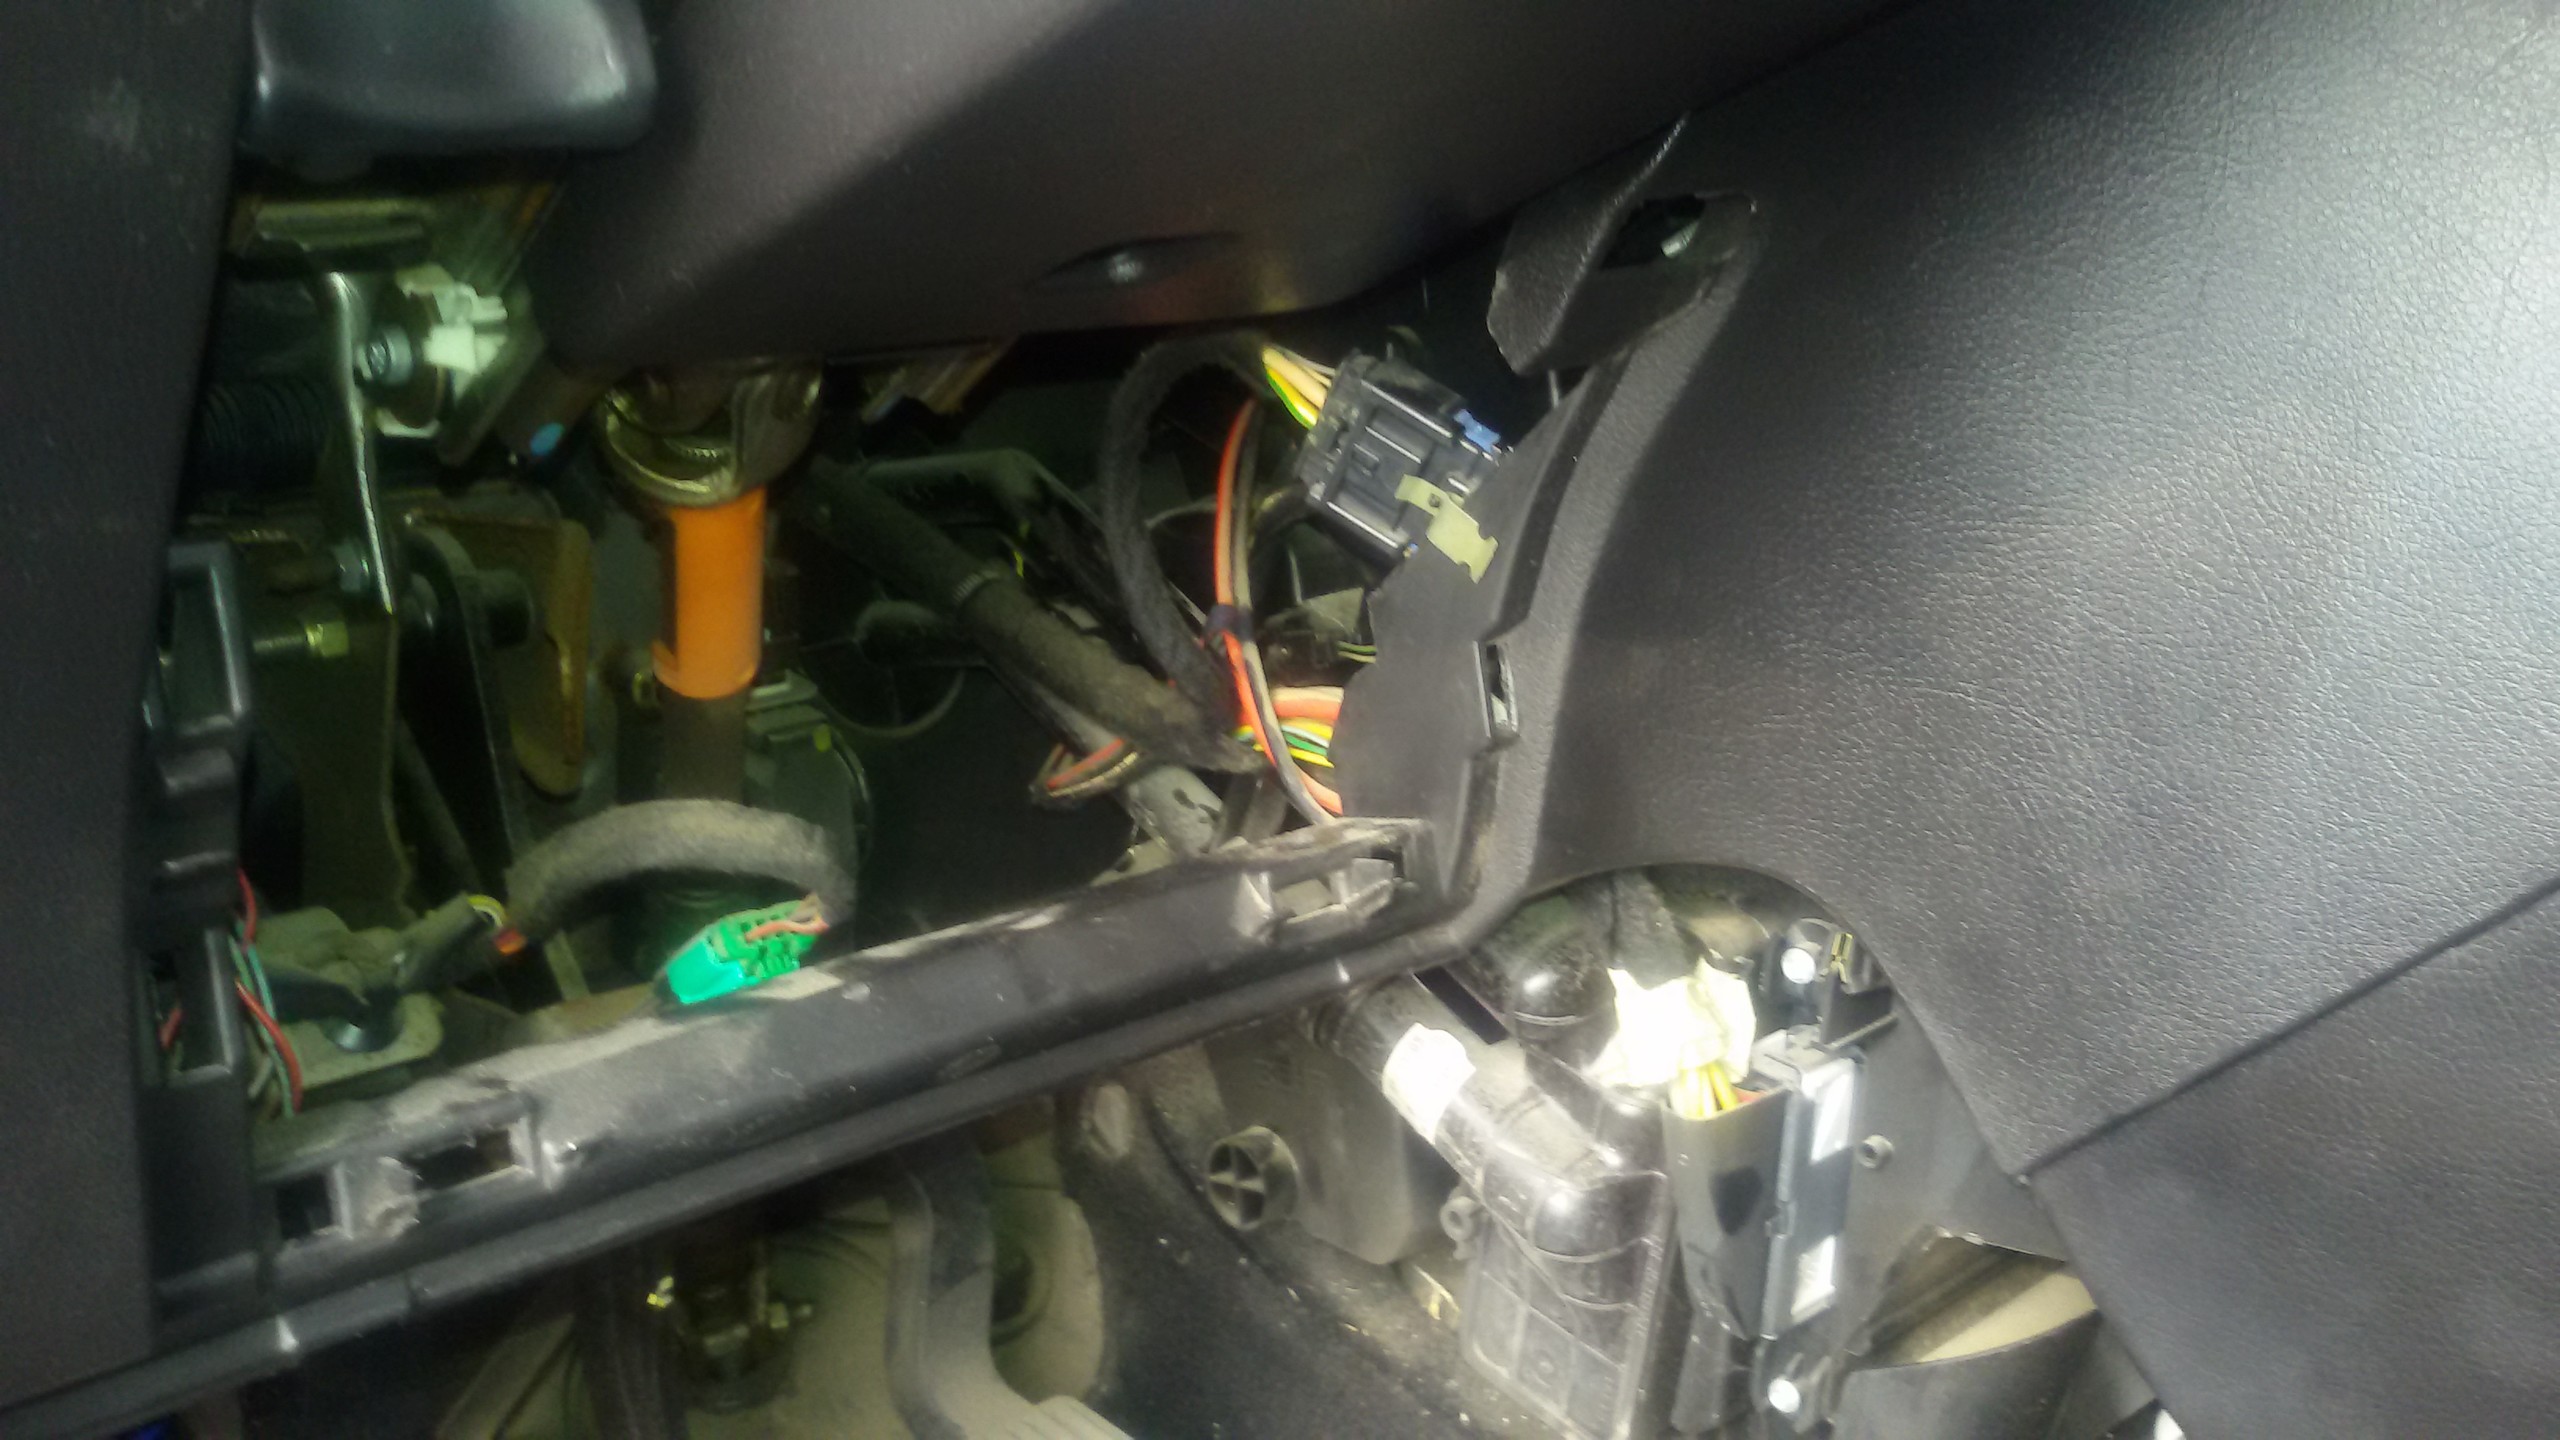 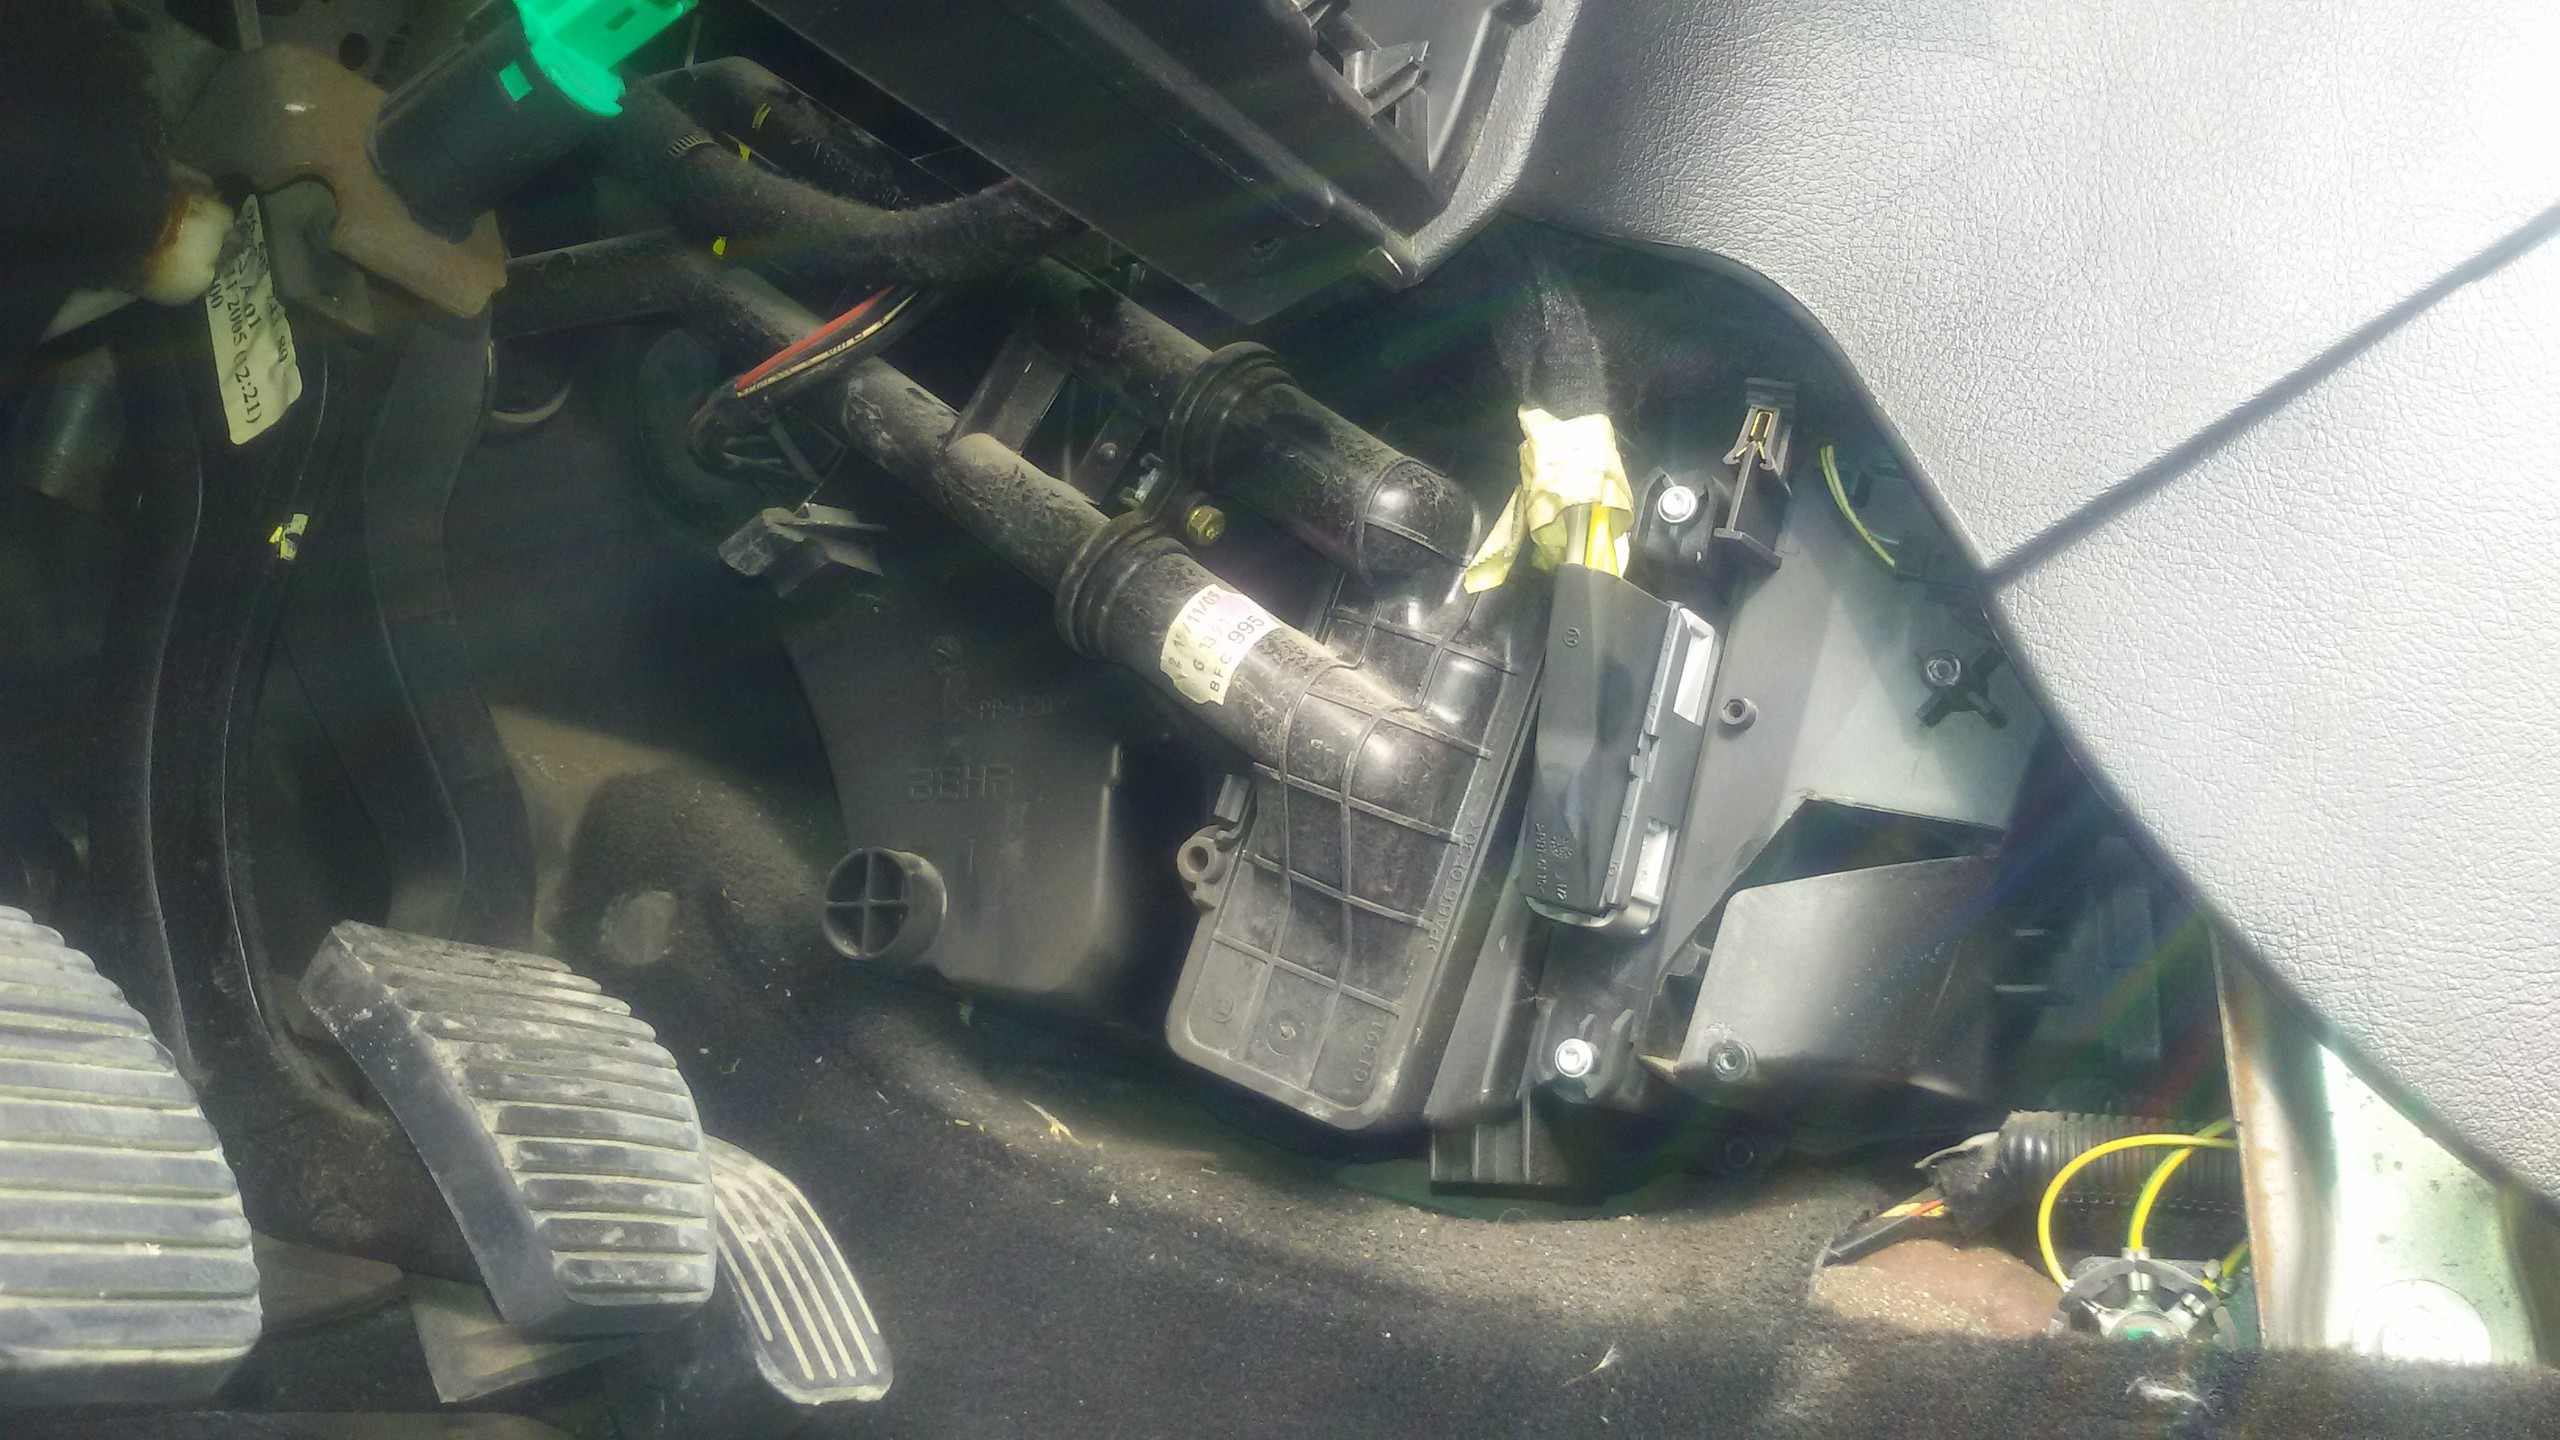 |
|
| 08.05.2020 20:15 | # 15 |
| sonerkyl |
|
|
This is the driver's side, my coach, the passenger's side, first of all, the gears there are usually problematic. frankly, I couldn't see the driver's side.
|
|
| 08.05.2020 20:15 | # 16 |
|
Unfortunately, it does not appear from the angle you shoot. I can't add a picture, I'm at work. In the middle of the first picture, it should be slightly below the socket attached to the plastic floor with a metal clamp. The plastic piece extending from left to right, that is, the lower nails of the top cover you have removed, expands by turning up on the right and joins the center console wall. Just below the junction. The gripper is over here. You will already be able to remove this place by flexing it towards the driver's seat. I said the hard part is here. In the middle of the second picture, the caliper core, which enters two parallel pipes, can be seen. It is just above the pipe inlet at the top. If you look from the bottom, you will definitely see it. The cable comes from the motor and its socket is visible. |
|
| 08.05.2020 20:15 | # 17 |
|
[QUOTE = eeccaa] Unfortunately, it does not appear from the angle you shot. I can't add a picture, I'm at work. In the middle of the first picture, it should be slightly below the socket attached to the plastic floor with a metal clamp. The plastic piece extending from left to right, that is, the lower nails of the top cover you have removed, expands by turning up on the right and joins the center console wall. Just below the junction. The gripper is over here. You will already be able to remove this place by flexing it towards the driver's seat. I said the hard part is here. In the middle of the second picture, the caliper core, which enters two parallel pipes, can be seen. It is just above the pipe inlet at the top. If you look from the bottom, you will definitely see it. The cable comes from the motor and its socket is visible. I pulled my head in such a way that the angle of the picture would take the entire area where I said I would look again, I couldn't see anything like a servo motor to disassemble when I stuck my head and look at other places
|
|
| 08.05.2020 20:15 | # 18 |
|
Unfortunately, the center console trim covers the top of the engine. Remove the fuse cover as well, expanding the space. You can also remove the cover under the door with the driver's door closed, to the left of the left-face ventilation grille, through the opening made by the fuse cover. I told them by looking at the door as much as possible.
|
|
| 08.05.2020 20:15 | # 19 |
|
Okay, I took care of the problem. As you said, it is very difficult to see exactly where you describe the plastic frame completely. Also it gets harder when you don't know what you're looking for.  After discovering the location of the engine, I started the air conditioner and took it to a cold before disassembling. If the engine is running, the problem is not there, in order not to disassemble it. After discovering the location of the engine, I started the air conditioner and took it to a cold before disassembling. If the engine is running, the problem is not there, in order not to disassemble it. The problem was there, the engine could not rotate, the gear was moving, I got stuck there and then I started to work and unscrew it. The real thing starts here, the guys who will attempt this job will think twice, if they do not have manual skills and are not patient, they should never get infected. In such an inverted place, the engine, unscrewing the screws, removing the second screw inside, cools the man from life I had to finish it because I had to start. It came to my mind to lubricate those gears and their surroundings. There was no problem with the gears. There were a few scratches on the fixed gear though, but not enough to prevent it from turning. If there was a problem with him, how I would get him out of there still couldn't figure it out. I lubricated it with engine oil, I learned that the main problem was not trying to replace it, while trying to replace it, it was very difficult for me to flex the plastic frame and install the servo motor instead. I was comfortable for 1 hour. Anyway, everything is over, I started the car and turned on the air conditioner and it works without any problems. The happiness he gave was exhausted. If I take it to the service or industry, they would not have paid less than 200 300 liras, so I brought this work for free. As you say alone, a footnote must be dropped. The friends who will try to do this need to adjust the directions of the motor and fixed gear before mounting it, otherwise they have to disassemble and do the same. I read your article from God and went down. Thank you again for your help.
|
|
| 08.05.2020 20:15 | # 20 |
|
digitals are a chronic problem. But if you ask why it would be better if you made the repair kit by taking the repair kit, because the gear you mentioned, that is, the gear that is impossible to come out, and the motor cannot turn it. |
|

