

|
|
|

|
About 206 Tape Socket (Assembled) |
| • Homepage » PEUGEOT MODIFIED PLATFORM » 206 | |
| 08.05.2020 19:22 | # 1 |
|
Briefly features: Head-up, 4x55 watt output power, usb, aux, folder selection, viewing song information on lcd, rds, amp output, remote control, red lights. I bought a Pioner TSG1645R 16 Cm Speaker beside 40 watts Rms, 250 watts max coax. I want to provide something similar to 13 cm inside the rear doors. The problem is that a socket like the one I expected from the tape box did not come out. Socket I expect to come out 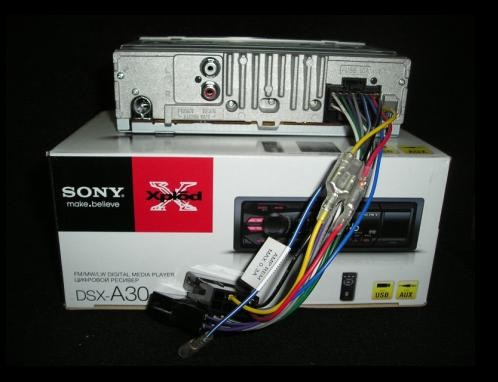 Socket from me 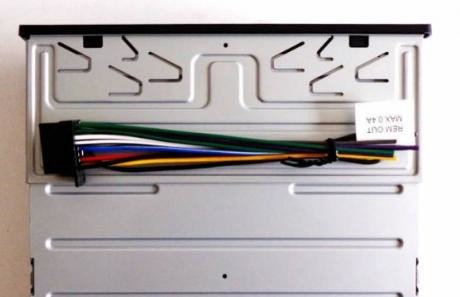 Now there is a missing in the box or I need to provide this type of socket from the outside, there is no equivalent for the socket coming out of me. I peel off the connections and make the connection, but it is my first choice. Also, how would it be to install a 13 cm midi set on the rear doors? |
|
| 08.05.2020 19:22 | # 2 |
 serky54 serky54 |
|
|
I read in a corner in the forum When I wear 17.5 on the front and 13cm on the back, I get a great sound without an amp. tape sony prevents 17.5 sony sound enough :) |
|
| 08.05.2020 19:22 | # 3 |
|
As a speaker, I chose 16 cm Pıoner for the front doors. I want to set something 13 cm in the same style, but I say if I wear a 13 cm md set up to 55 watt rms. |
|
| 08.05.2020 19:22 | # 4 |
 Alicilik Alicilik |
|
|
http://urun.gittigidiyor.com/otomobil-motor-aksesuar/iso-soket-oto-teyp-disi-baglanti-kablosu-1kalite-178112582 You need to take this product and join the cable ends. My advice as the speakers is the 20-40 w rms band, 165mm behind them, 130mm sony speaker speakers. For tape output not to prefer component. |
|
| 08.05.2020 19:22 | # 5 |
|
I understand, I can assure myself that it is ready for some models now. Thank you in recommendations. As a speaker, I took the piano 16 cm coax speaker in the picture. 40 watt rms 250 waat max power 2 way. There are rear speakers left, I can buy them sony, there is a model with 13 cm 3 way 30 watt rms 230 watts max power features. The tape has a W / R input, but I can't get into the steering control business yet, so maybe I can think later. Finally, do I have a chance to apply something to the ends of the speaker cables in order not to cut the socket cable coming from the original socket car? I will install tomorrow, clean workmanship is my first choice. |
|
| 08.05.2020 19:22 | # 6 |
| Alicilik |
|
|
You make a joystick with a nickname of cherno35. 40-50TL Wrap the original speaker socket with tape and fix it if you can not find the terminal, peel and attach. The same situation is valid for all tapes. Pioneerin xx00 li series is ISO socket xx50li series is cut. |
|
| 08.05.2020 19:22 | # 7 |
|
Thanks for the information you provided and for taking the time and writing ... |
|
| 08.05.2020 19:22 | # 8 |
|
The assembly is done first, there is a subject I want to ask, and then I will add supporting images and informations for friends who want to apply the workmanship and auto tape assembly to their own vehicles. First of all, there are 4 cables coming from my question vehicle white cable (Electricity coming directly from the battery) Yellow - Green Thick Cable (Chassis) Blue thick cable (Contact cable coming from the brain) Gray Thin cable amp trigger (Antenna output) My connection method is I connected the black work cable (Yellow to green) from the tape, the Red plus cable to the Thick blue cable, that is, the contact cable and the Yellow memory cable to the white cable directly from the battery. I do not know the nature of the Sony tape yet, since the yellow memory cable is connected directly to the power cable from the battery, I would like to consult if I need to do anything extra. |
|
| 08.05.2020 19:22 | # 9 |
| Alicilik |
|
|
Black or yellow-green thick cable is chassis in the socket of the vehicle. Battery and contact cables on its double side and under 4. I don't know how in Sony, but you need to connect the contact and battery correctly. After the contact is cut, the tape closes and the memory fed from the battery draws very low current. It should not be feared, it should take 50 to 60 ma. |
|
| 08.05.2020 19:22 | # 10 |
|
Peugeot 206 ya teyp ve hoparlör montajına gelince Usb çalarlı biraz daha kalitesi düşük bir teyp ve orjinal hoparlörleri bulunan aracıma Sony DSX A35U Teyp bağlantısı ve beraberinde Pıoner 16 Cm 40 watt rms max 250 watt güç üreten 2 yollu bir coax bağlantısı yapıcaz.Ürünler konu başında bahsi geçen ürünlerdir. Öncelikle Teyp kutumuzdan çıkan soket bu şekilde ve biz bunu araçtan gelen kablolara soketlere uyarlamamız gerekicek ve başlıyoruz. 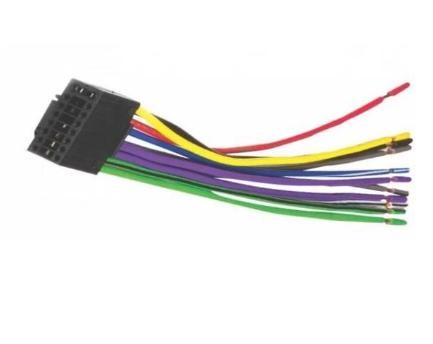 Görünen o ki sokette karşılık yok karşılıkları temin ettik ama önce eski teybi söküp bağlantılarına bakıcaz daha önce nasıl yapılmış ve teybi çıkarttık ne görelim daha önce yapılan bağlantı kablolar sıyırtılarak yapılmış ve soketler boş duruyor yapıcak birşey yok zaten olan olmuş şimdi biz bunu nasıl en iyi şekilde yaparız ona bakıcaz. Eski teyp bağlantılarından bantlarından kurtuluyoruz.Eski teyp soketi sony teybe uymadı. 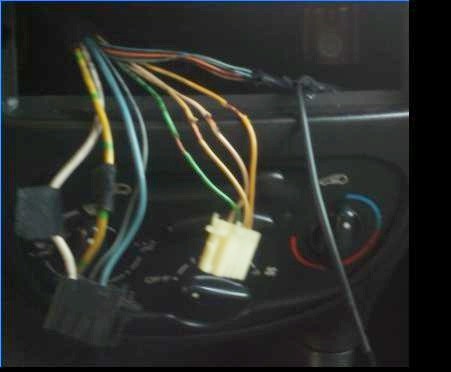 ve kalan görüntü bu şekilde araçtan gelen toplamda 3 soket bir tanede anten kablosu var soketlerin biri elektriksel bağlantı soketi,diğeri ön kapı hoparlörleri için (4 Adet kablo var sokette galba arka kapı hoparlör kablo tesisatı yok) diğer sokette ince kablolar mevcut ne olduğunu bilmiyorum o soketin.Hiç bir yere bağlantısı yok boştaydı tamamen.Eski teyp bağlantısı teypten gelen hafıza ve artı kablo birleştirilip araçtan gelen beyaz kabloya bağlanmıştı ben bunları ayırıcam böyle bağlantı istemiyorum.Bu şekilde olduğunda kontak kapalıda olsa açıkta olsa teyp açılabiliyor unutmalara karşı tehlike var ayrıca saat gösteriyor çok lazımmış gibi enerji kaybı boşuna. Durumu bu hale getirdikten sonra araçtan gelen kabloları açıklayım en soldaki soket elektriksel bağlantı soketi beyaz kablo aküden direk gelen 12 Volt enerji,Sarı-Yeşil kablo ise eksi şase kablosu,ince gri gibi mavi gibi olan kabloda anten tetik kablosu anfi kullanımında işe yarar o yüzden bizim işimiz onunla şuan yok,Mavi kablo ise bsı den kontaktan gelen kablodur. Hemen yanındaki sokette ise yeşil ve sarı kablolar görüyoruz bunlarda ön kapı hoparlörlerine ait diğer kullanım dışı olan soketi arkaya ittim siyah kalın kablo anten kablosudur. Orjinal anten kablosu uymadığı için sony teybe uygun anten ucu aldım orjinal anten ucunu kesip sony teyp uyumlu ucu ekleyip birleştirdim ve izole ettim. Herşey hazır olduğuna göre şimdi geldi teyp soketini uyarlamaya soket sırf kablo sigorta falan yok içim el vermedi iki tane 5 amper cam sigorta ve sigortalık aldım. 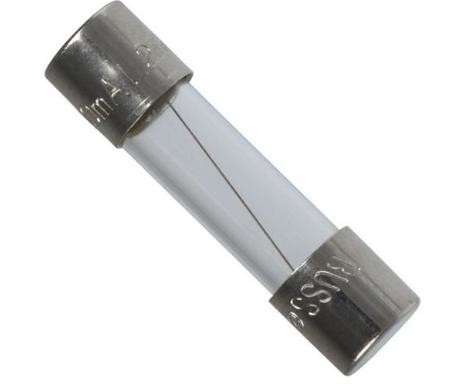 Teyp soketini araçtan gelicek kablolara bağlantı yapmak üzere uygun hale getirdim.Ve bağlantı öncesi son görüntüsü ; 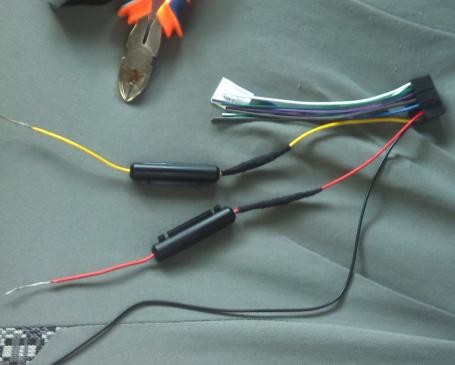 Daha sonra bu soketin ilgili kablo uçlarını yan keski ile açıyoruz ve araçtan gelen teyp için elektriksel bağlantı kablolarını içeren soketi elmize alıyoruz.Tamamen kesmeden sıyrık olan yerlere teyp soketinin siyah kablosunu araçtan gelen sarı yeşile(Yani eksi olan şase kablolarını birleştirmiş oluyoruz böylelikle) yine teyp soketinin kırmızı besleme artı kablosunu mavi kontak kalosuna yine teyp soketinin sarı hafıza kablosunuda sürekli artı elektrik içeren direk aküden gelen beyaz kabloya bağlantısını yapıyoruz.Böylelikle hem teyp kapandığında ayarlar kaybolmamış olucak hemde kontak kapalıyken teybi çalıştıramıcaz.Diğer bir bağlantı şeklide sarı hafıza kablosu ile kırmızı artı kablosunu birleştirerek direk beyaz kabloya takmak bu bağlantı şeklinde teyp kontaktan bağımsız olarak açılır kapanır durumda olucak. Tüm izoleleri yapıyoruz ve tamamdır.Şimdi hoparlörlerin kapıya montajı ve bağlantıları yapılacak.Kapı sökmeyi anlatmıyorum oldukça fazla döküman resim ve video var internet üzerinde bunlardan faydalanabilirsiniz.Kapı panzidotlarını söküyoruz. 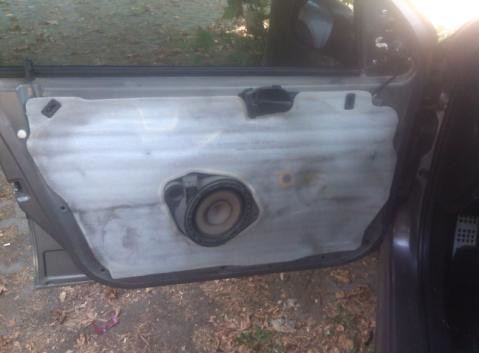 Böyle bir görüntü çıkıyor karşımıza eski hoparlörlerin vidalarını sökerek çıkartıyoruz ardından orjinaller soketli olduğu için ve bizde buna uygun soket bulamadığımız için yine ek yöntemi uygulıcaz sokkette 4 kablo var twetter olduğu için orjinalde bu kabloların ikisi hoparlörler ile diğerleri twetterlarla alakalı biz soketin sarı ve yeşil olan kablolarını baz alıcaz sadece yeşil kabloyu artı sarı kabloyu eksi olarak belirliyoruz çeşitli belirleme yöntemleri var ölçü aleti veya kabloyu dile değdirme :) daha sonra bağlantıyı yapıp izole ediyoruz.Araç soketindeki yani kapılardan teyp bölümüne gelen hoparlör kablolarından sarı ve yeşili bulup bunlarıda teyp soket kabloları ile birleştiriyoruz.Teyp soketinden gelen gri renk kablolarla birleştirdik bunları düz gri artı kablo siyah çizgili gri kablo ise teyp çıkışından gelen hoparlör kablolarının eksi kablosudur.Sesi test ediyoruz. ve yeni hoparlörlerimizi oldu kabul ederek son olarak iyice sabitleyip bırakıyoruz . 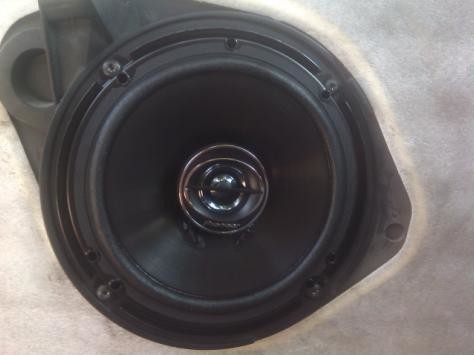 Kapı döşemesini yerine takıp diğer kapıya geçiyoruz bundada aynı şekilde uygulayıp işlemi bitiriyoruz.Sağ kapı zorlardı beni artı eksiyi belirlemekte terste çevirsem ne yaparsam yapayım bass-tizz aynı sesi veriyor ve bass lar içe dışa aynı şekilde vuruyor ne yapsam çözemedim kulağımın en güzel algıladığı halde bıraktım umarım yanlış olsa bile cihazlar zarar görmez yoksa üzülürüm.Bu konuda yapmam gereken birşey varsa da fikir verirseniz tekrar denerım ama son olarak bir sıkıntıya rastlamadım gayet net ve güzel bir ses oluştu. Bunları bitirdikten sonra teyp kısmına tekrar geçiyoruz hoparlör ve elektriksel bağlantılar bitti teyp kızağını teypten ayırıp aracın yuvasına yerleştiriyoruz bunu nasıl yapmamız gerektiği teyp kitapçığında mevcut.Kızak yerleştirildikten sonra kızak üzerinde bir kaç tırnak yamultup kızağı aracın teyp yuvasına sabitlemiş oluyoruz. 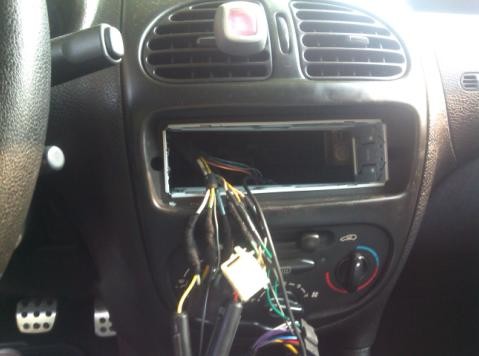 Ardından kabloları dıkkatlice geriye itip soketi teybe takıyoruz ardından anten ucunuda takıyoruz son kontrolleri yapıp teybi yuvaya oturtuyoruz son olarak teyp çerçevesini takıyoruz ve tamamdır. Kontağı çevirip teybi açıyoruz ve ses tartışmasız eski halinden baya bir ötede ama arka kapıların şuanlık boş kalması eksikliğini gösteriyor olsun doldururuz onlarıda ama bunların kablo bağlantılarını çözemedim bilen varsa yol gösterirse sevınırım olmadı kablo çekerim göğüse kadar ama boşuna uğraşmış olmak istemem. Neyse ürünler beni tatmin etti düşünenlere tavsiyemdir,ayrıca sorunsuz bir montaj oldu benim için ancak bu işe elektronık ve elektrik bılgisi el becerisi olmayanların girmesini tavsiye etmem.Benim deneyimim olduğu halde hergün bu işi yapmadığım için tereddütlerim oldu bazı noktalarda ayrıca araçta elektronık işi şakaya gelmez ufak hatada beyin arzasına bile yol açabilir.Zaman ayırmak planlı çalışmak ve bilgi gerektirir bu işlemler.Ben yaparım diyenlere anlatımımın belki bir kaç noktası fayda sağlar diye paylaşmak istedim.Ürünlerde hoşuma gitti her ikisinide tavsiye ederim. |
|
| 08.05.2020 19:22 | # 11 |
|
[QUOTE = Receiving] Black or yellow-green thick cable is chassis in the vehicle socket. Battery and contact cables on its double side and under 4. I don't know how in Sony, but you need to connect the contact and battery correctly. After the contact is cut, the tape closes and the memory fed from the battery draws very low current. It should not be feared, it should take 50 to 60 ma fln. [/ QUOTE] Thank you again I did not sense any oddness for now, I mentioned in my narration, the tape does not open when the contact is closed, I press the opening button after the ignition is turned on, then I press the close button, the clock is on and the tape lights are on, when I press the close button, it closes completely, the key does not open again, the tape does not open again, the equalizer clock, etc. It continues from where it left off and gives a warning sound 3 times when you turn off the tape and remove the key from the contact. |
|
| 08.05.2020 19:22 | # 12 |
| Alicilik |
|
|
Congratulations.
|
|
| 08.05.2020 19:22 | # 13 |
|
Thanks, it was a little simple, I could not go into detail, but I think it is still a general idea. |
|

