|
|
|

|
307 Front Bumper and Belts Removal |
| • Homepage » PEUGEOT MODIFIED PLATFORM » 307 | |
| 08.05.2020 14:10 | # 1 |
 hasimayaz hasimayaz |
|
|
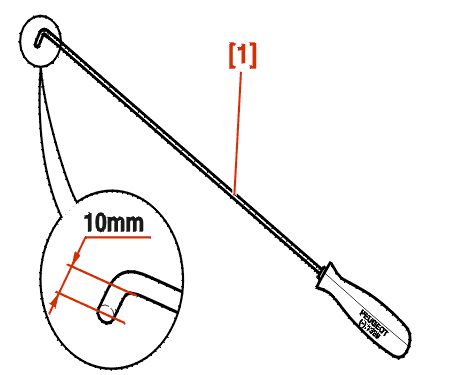
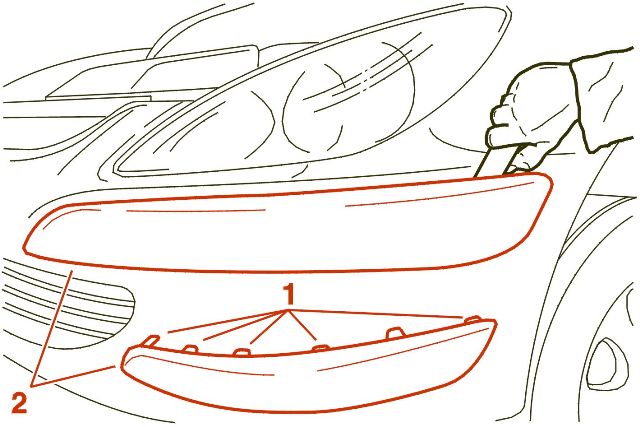
C4AG0UF1 - 307 REMOVAL - REFITTING FRONT BUMPER 1 - SPECIAL TOOLS
The hook (-). 1339 was cut to 10 mm in length to unscrew it. 2 - REMOVAL NOTE / INFORMATION: The front grille is separate from the bumpers. Remove: headlight washer chokes
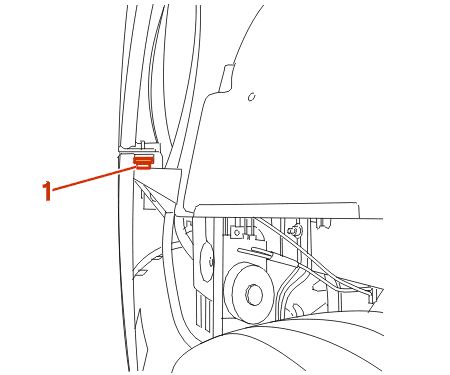
Remove the fastenings (1).
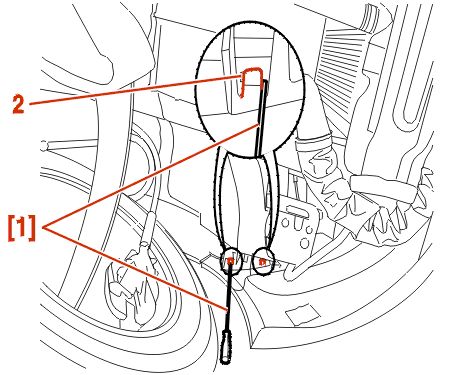
Install tool [1], and turn one half turn to release the clips (2) of the bumpers.
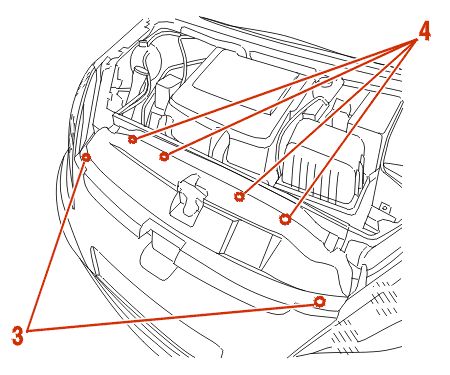
Remove: the fasteners (3) 3 - REFITTING Place the bumpers and clip each edge with a clip. Continue insertion following the reverse order of removal steps. C4AG0VF1 - 307 REMOVAL - REFITTING FRONT BUMPER STRIP 1 - REMOVAL
Using a plastic spatula, detach the bar (1) from its clips (2). Remove the bumper trim (2). 2 - REFITTING Follow the reverse order of removal steps. Notice that the band clips are firmly attached. Haşim Ayaz |
|
| 08.05.2020 14:10 | # 2 |
| pug307_26 |
|
|
Thank you very much for your hands, health and wellness;) |
|
| 08.05.2020 14:10 | # 3 |
|
Haşim evening applause 
|
|
| 08.05.2020 14:10 | # 4 |
 heffera heffera |
|
|
thanks it helped ...
|
|
| 08.05.2020 14:10 | # 5 |
|
I found the document I try it on the weekend :))
|
|
| 08.05.2020 14:10 | # 6 |
 orhanax orhanax |
|
|
Thanks. Useful sharing.
|
|
| 08.05.2020 14:10 | # 7 |
 tayfur tayfur |
|
|
How do I disassemble the headlight? I have a scheme.
|
|
| 08.05.2020 14:10 | # 8 |
|
[QUOTE = tayfur] How to disassemble the headlight, its scheme, I have to remove the water and silicon it. [/ QUOTE] You need to insert the bumper. After inserting, it holds with 3 screws. It's a simple process. |
|
| 08.05.2020 14:10 | # 9 |
 gozem gozem |
|
|
[QUOTE = Koliva] [QUOTE = tayfur] How to disassemble the headlight, its scheme, I have to remove the water and silicon it. [/ QUOTE] You need to insert the bumper. After inserting, it holds with 3 screws. It's a simple process. [/ QUOTE] Koliva, by writing this message, now you had to reply to how the bumper was removed 
|
|
| 08.05.2020 14:10 | # 10 |
|
[QUOTE = I Yoshinaka] Koliva, by writing this message, now you had to reply to how the bumper was removed [/ QUOTE] 1. Insert them in the hoods of ten tires, where the bumper joins the hood, there will be a 10mm socket screw inside. 2. Lying under the car, insert the clips under the bumper (2 pieces). 3. Again, lie under the vehicle and insert the 2 screws underneath the radiator. 4. Open the hood and insert the two screws on the side. Then remove the 4 clips on the back with a flat screwdriver. 5. While holding the screw you removed in step 1, pull the bumper towards you. Ic ice has legs that have already passed, it will be separated when they get rid of them. Good luck with. |
|
| 08.05.2020 14:10 | # 11 |
 mdincer34 mdincer34 |
|
|
koliva is the savior of the site in terms of dismantling and disassembling vehicles in every respect.
|
|
| 08.05.2020 14:10 | # 12 |
| gozem |
|
|
[QUOTE = mdincer34] koliva is the savior of the site in terms of dismantling and disassembling vehicles in every respect. I agree with the information that helps us a lot, thanks Koliva. I just want to ask without opening a new topic. I saw it in the Pt How-To section, but I couldn't do it. I couldn't disassemble the steering wheel. Push it with a flat screwdriver, but nothing happens when I try it. Not on a flexible surface, is there any that has been removed before? help help 
|
|
| 08.05.2020 14:10 | # 13 |
| Haksen016 |
|
|
thanks for sharing.
|
|
| 08.05.2020 14:10 | # 14 |
|
Thank you for your compliments. [QUOTE = I Yoshinaka] I agree with the information that helps us a lot, thanks Koliva. I just want to ask without opening a new topic. I saw it in the Pt How-To section, but I couldn't do it. I couldn't disassemble the steering wheel. Push it with a flat screwdriver, but nothing happens when I try it. Not on a flexible surface, is there any that has been removed before? help help [/ QUOTE] Before you start doing these things, you need to insert the negative pole of the battery and wait 30 minutes. Otherwise there is a risk of explosion in the face when removing the airbag. Insert the screwdriver into the hole and push it, as in the picture below. It is on the right side of the same hole, push it in the same way and pull out the airbag part. Be careful, after pulling out too many cables because there are cables in the back. 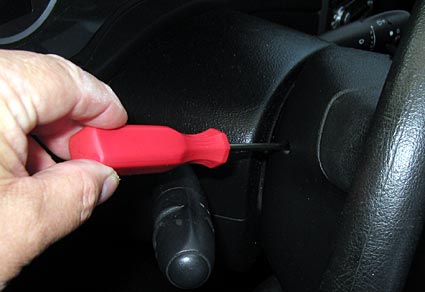 The picture below shows the removed airbag. I put it in order to explain what the above process worked. The iron bar indicated by the red arrow is our screwdriver. It was inserted through the hole on the left and pushed. The aim is to move the iron holding the airbag and get rid of the airbag slot by the blue arrow. There is the same iron bar on the right side of the same picture. That's for the right side. 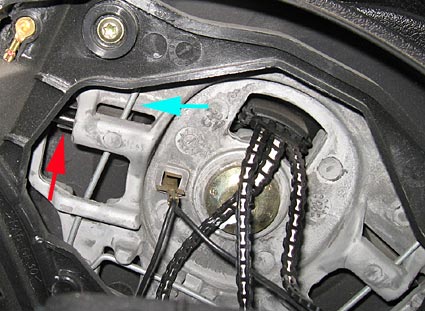 Good luck with. |
|
| 08.05.2020 14:10 | # 15 |
 sedataksu sedataksu |
|
|
Koliva, cheers to the brother. |
|